-
Getting started
-
Headset and link box
-
Headset
- About the VIVE Pro 2 headset
- Putting on the VIVE Pro 2 headset
- Adjusting the IPD on the headset
- Can I wear my prescription glasses while using VIVE Pro 2?
- Adjusting the lens distance on the headset
- Replacing the face cushion
- Connecting a USB device to the VIVE Pro 2 headset
- Removing the headset earphones
- Installing your own headphones
- Reinstalling the headset earphones
- Reattaching the head pad on the headset strap
- Updating the headset firmware
- What does the status light on the headset mean?
- What is the dual camera used for?
-
VIVE Link Box (2.0)
-
Product care and repair
-
Common solutions
- How do I fix issues such as the display turning black or showing static?
- What can I do to troubleshoot the headset?
- What can I do when the status light on the headset indicates an error?
- What should I do if the headset is not tracked?
- My headset display is blurry. What should I do?
- What can I do to resolve the "headset not found" error?
- My headset can't be detected due to a USB port issue. What should I do?
- After upgrading to Windows 10, VIVE shows as the computer's main monitor. What should I do?
- I'm experiencing skipped frames. What could I do?
- I'm seeing drifting motion or floating objects in VR. What could I do?
- There's no audio when I use my USB Type-C headphones.
- Is there a way to also hear from the computer what's in VR?
- What can I do if the headset's dual camera won't turn on?
- What should I do if there's cracking noise from the headset earphones?
- What can I do if the headset connection status is unstable?
- While the headset is connected, my PC beeps when rebooting.
-
-
Base stations
-
Base Station 2.0
- About SteamVR Base Station 2.0
- Installing SteamVR Base Station 2.0
- Tips for setting up SteamVR Base Station 2.0
- How many SteamVR Base Stations 2.0 can I use in a single setup?
- What things should I consider when installing more than two SteamVR Base Stations 2.0?
- Setting up additional base stations
- What are the minimum and maximum play area when using more than two SteamVR Base Stations 2.0?
- My available space has an irregular shape. Can I still set up more than two SteamVR Base Stations 2.0?
- Can I use an odd number of SteamVR Base Stations 2.0?
- Configuring the base station channels
- How can I check which base stations are currently in use?
- Using the mounting kit to install SteamVR Base Station 2.0
- Cleaning the base stations
-
Base Station 1.0
-
Base Station 1.0 and 2.0 FAQs
-
-
Controllers
- About VIVE Controllers (2018)
- Charging the controllers
- Turning the controllers on or off
- Pairing the controllers with the headset
- Attaching the lanyards to the controllers
- Updating controller firmware
- What does the status light on the controllers mean?
- What should I do if a controller is not tracked?
- How do I know which controller is not tracked?
- What can I do if the controller trackpad is oversensitive?
- What should I do if my controller won't turn on?
- The controller automatically turns off. What should I do?
- How do I recover my controller after an interrupted update?
-
Play area
- What is the play area?
- Choosing the play area
- Planning your play area
- Setting up a standing-only play area
- Setting up a room-scale play area
- Verifying your setup
- After setting up, how do I turn the VIVE system on?
- What is the recommended space for the play area?
- Can I include space occupied by furniture for the play area?
- Can seated/standing-only experiences work at room scale?
- How do I fix download errors during VIVE Setup installation?
- I can't complete the room setup. What should I do?
-
Settings
-
Audio settings
-
System Dashboard settings
-
SteamVR
-
- Contact Us
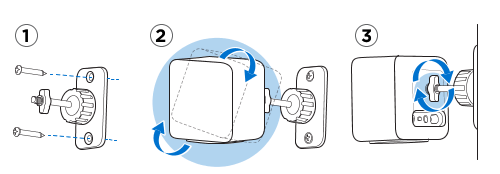
Using the mounting kit to install Base Station 1.0
For best results, install the base stations using a mounting kit. If you purchased the first-generation
VIVE, it has the mounting kit in the box.
Otherwise, you can separately purchase a similar mounting kit from a third-party supplier.
Note: You will need a screwdriver or drill to install the mounts. Ask a professional for help when using power tools.
-
Mark where you want to install each of the mounts on your wall, and then screw the mounts in.
When mounting on concrete or drywall, first drill ¼ inch holes and insert anchors before screwing mounts in.
- Rotate the base station to screw it onto the threaded ball joint. Do not screw the base station all the way in, only enough to be stable and oriented correctly.
-
Tighten the wingnut to the base station to secure it in place.
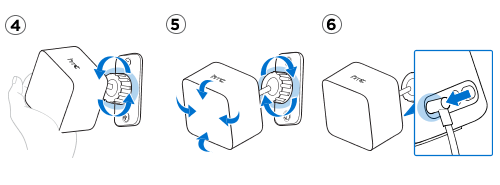
- To adjust the angle of the base station, loosen the clamping ring while carefully holding the base station to prevent it from falling.
-
Tilt the base station toward the play area.
Make sure it has an unobstructed view of the other base station. Each base station has a 120-degree field of view. They should be angled down between 30 and 45 degrees.
To fix the angle of the base station, tighten the clamping ring back in.
-
Attach the power cable to each base station.
Was this helpful?
Yes
No
Submit
Thank you! Your feedback helps others to see the most helpful information.