-
Introduction
-
Tracking modes
-
ArUco markers and marker-based tracking features
-
ArUco markers
-
Marker-based tracking features
-
-
Marker-Based Location Sharing setup
- Setting up Marker-Based Location Sharing
- Creating ArUco markers for Marker-Based Location Sharing
- Aligning the height of a virtual scene using an ArUco marker
- Moving a user to a specific point in a virtual scene
- Setting up Marker-Based Location Sharing with VIVE Business Streaming
- Marker-Based Location Sharing APIs (AIO)
- Marker-Based Location Sharing APIs (PC VR)
-
LBE Mode/LBE Hybrid Mode setup
-
LBE map configuration
-
Marker-Based Drift Prevention setup
-
Marker-Based Advanced Relocation setup
-
Marker-Based Scene Alignment setup
- Setting up Marker-Based Scene Alignment
- Configuring the position of an ArUco marker in a virtual scene (Unity)
- Creating ArUco markers for Marker-Based Scene Alignment
- Setting up Marker-Based Scene Alignment with VIVE Business Streaming
- Marker-Based Scene Alignment APIs (AIO)
- Marker-Based Scene Alignment APIs (PC VR)
-
Simulator VR Mode setup
- Setting up Simulator VR Mode
- Pairing wrist trackers with a headset
- Installing an anchor controller or tracker in a VR simulator
- Coordinate alignment
- Anchor controller and tracker origin points
- Aligning VR and anchor coordinate systems using a VR controller
- Aligning VR and anchor coordinate systems using an ArUco marker
- Simulator VR Mode FAQs
-
Other services
-
Additional features
- Contact Us
Anchor controller and tracker origin points
The origin points of an anchor controller or wrist tracker are defined as follows:
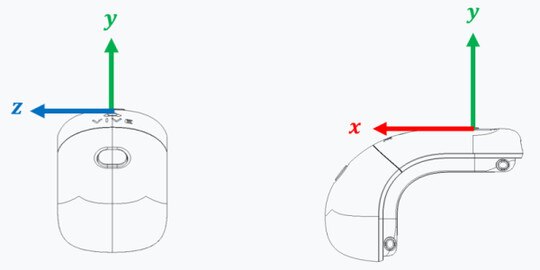
Anchor controller origin
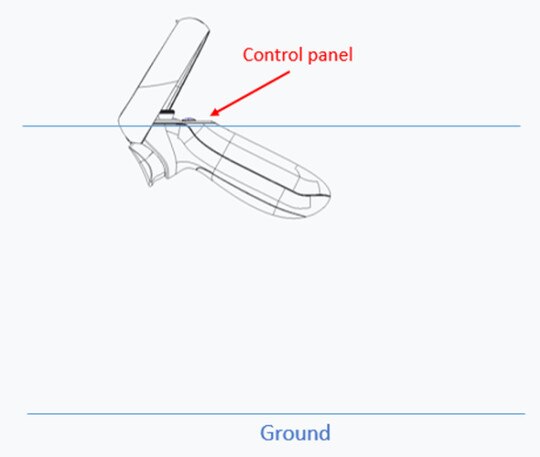
When installing an anchor controller, make sure the control panel is parallel to the ground (horizontal).
The anchor controller's y axis is perpendicular to the control panel, and the z axis is parallel to the controller handle. The x axis is perpendicular to the y axis, following the right-hand rule.
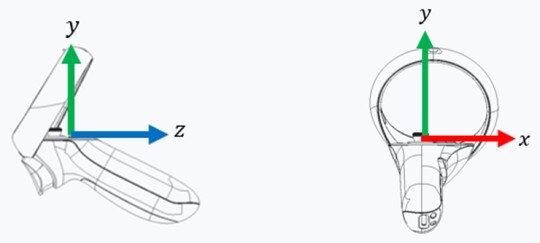
Anchor wrist tracker origin
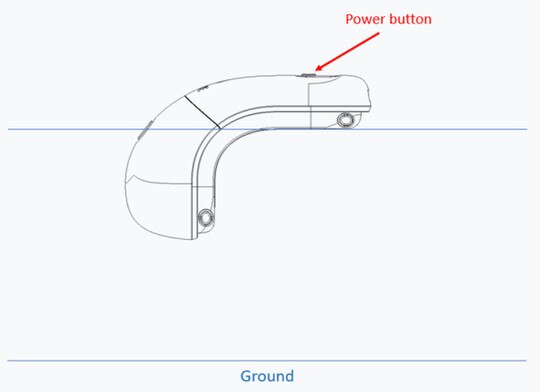
When installing an anchor wrist tracker, make sure the surface opposite the Power button is parallel to the ground (horizontal).
The anchor wrist tracker's y axis is perpendicular to the side with the Power button. The x axis extends toward the VIVE logo, and the z axis is perpendicular to the y axis, following the right-hand rule.