-
Overview
-
Getting started
-
Assembly
-
Setup (headset and controllers)
-
Setup (play area)
-
Basics
-
Mixed reality
-
Additional accessories
-
-
Managing screenshots, files, and apps
- Connecting the headset to your computer
- Transferring screenshots and screen recordings to your computer
- Browsing and viewing files
- Viewing 360° photos
- Connecting an external storage device to the headset
- Transferring files between the headset and an external storage device
- Installing apps on the headset
- Installing APK files on the headset
- Uninstalling apps
- Changing app permissions
-
Using VIVE Manager
-
Sharing and streaming content
-
Settings
- Connecting to a Wi-Fi network
- Setting a device passcode
- Installing system and firmware updates
- Resetting your headset (factory reset)
- Adjusting the power frequency
- Choosing a display mode
- Setting a timeout for sleep mode
- Adjusting audio settings
- Choosing a tracking mode
- Pairing Bluetooth devices
- Setting up and using Kiosk mode
- Adding a VPN connection
-
VIVE XR Elite for Business
-
Solutions and FAQs
-
General
-
Hardware
- What should I do when the headset is unable to detect the controllers?
- How do I check the battery level of the headset and controllers?
- Why isn't the battery percentage displaying correctly?
- Why does my headset turn off when it's connected to a power bank?
- Why won't the headset turn on?
- How long is the USB-C to USB-C cable that comes with the headset?
- Can I connect a wired USB-C audio device to the headset?
-
Apps and content
-
- Contact Us
Removing and reattaching the gasket spacer
The
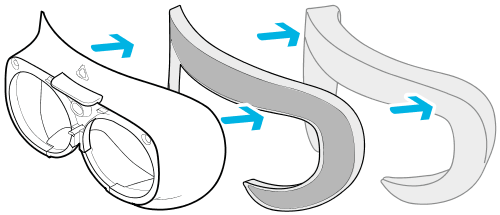
VIVE Face Gasket 2.0 for XR Series is preinstalled with a gasket spacer and cushion which provide a comfortable fit for a wide range of facial structures.
Note: The gasket spacer is included for added comfort, but you can remove it if it blocks any part of your view or if light leaks into the headset.
Removing the spacer
Detach the cushion and remove the spacer from the face gasket frame.


Reattaching the spacer
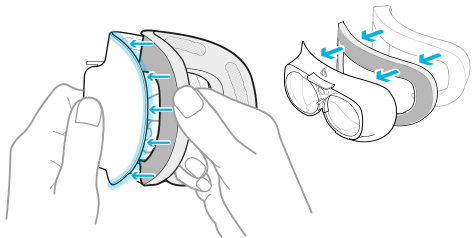
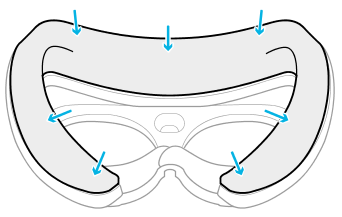
Align the edges of the spacer with the edges of the face gasket frame. Press the entire spacer against the gasket frame to securely adhere them to each other.

Check each side and make sure everything lines up.

Important: Make sure the nose flaps are not caught between the spacer and gasket frame.


To attach the cushion, align it with the edges of the spacer and press firmly. Make sure the nose flaps are not caught between the spacer and cushion.

Tip: If the face gasket's preinstalled cushion doesn't fit perfectly, you can try replacing it with the other cushion included in the box. See the accessories listed in
VIVE Deluxe Pack for XR Series for details.
Was this helpful?
Yes
No
Submit
Thank you! Your feedback helps others to see the most helpful information.