-
Overview
-
Getting started
-
Assembly
-
Setup (headset and controllers)
-
Setup (play area)
-
Basics
-
Mixed reality
-
Additional accessories
-
-
Managing screenshots, files, and apps
- Connecting the headset to your computer
- Transferring screenshots and screen recordings to your computer
- Browsing and viewing files
- Viewing 360° photos
- Connecting an external storage device to the headset
- Transferring files between the headset and an external storage device
- Installing apps on the headset
- Installing APK files on the headset
- Uninstalling apps
- Changing app permissions
-
Using VIVE Manager
-
Sharing and streaming content
-
Settings
- Connecting to a Wi-Fi network
- Setting a device passcode
- Installing system and firmware updates
- Resetting your headset (factory reset)
- Adjusting the power frequency
- Choosing a display mode
- Setting a timeout for sleep mode
- Adjusting audio settings
- Choosing a tracking mode
- Pairing Bluetooth devices
- Setting up and using Kiosk mode
- Adding a VPN connection
-
VIVE XR Elite for Business
-
Solutions and FAQs
-
General
-
Hardware
- What should I do when the headset is unable to detect the controllers?
- How do I check the battery level of the headset and controllers?
- Why isn't the battery percentage displaying correctly?
- Why does my headset turn off when it's connected to a power bank?
- Why won't the headset turn on?
- How long is the USB-C to USB-C cable that comes with the headset?
- Can I connect a wired USB-C audio device to the headset?
-
Apps and content
-
- Contact Us
Mirroring your phone screen to VIVE XR Elite
You can mirror your phone screen to
VIVE XR Elite so you can use your phone without taking off the headset.
You can navigate your phone, launch mobile apps, and view photos and videos in VR.
Important:
- Phone mirroring is only available for Android phones.
- To use phone mirroring, your phone must support
Miracast. You can also stream DRM-protected content to the headset as long as your phone supports HDCP 2.2 or later.
To check your phone's compatibility, see Phones compatible with VIVE XR Elite.
- Make sure to pair VIVE Manager with your headset if you haven't done so. For details, see Pairing VIVE Manager with a new headset.
Before mirroring your phone screen, make sure your headset is connected to
VIVE Manager and your phone screen is on and unlocked. Your phone's
Bluetooth® and
Wi-Fi® must also be turned on.
Here's how to mirror your phone screen to the headset:
- Put on your headset.
- In the Library, select Phone mirroring.
-
When you see the
Invitation to connect dialog box, select
Accept.
Your phone screen will be displayed in VR.
- Aim the beam anywhere on your phone screen to interact with it just as you'd normally do on your phone.
-
Use the toolbar below the phone screen to do the following:

Option Description 
Go back to the previous screen. 
Open your phone's voice assistant (for example, Google Assistant). 
Change phone mirroring settings. For details, see Changing phone mirroring settings. 
Switch the screen orientation between portrait and landscape. After switching to landscape orientation, you'll see the Curved screen button
 on the toolbar. You can select the button to change between a curved and flat screen.
Tip:
on the toolbar. You can select the button to change between a curved and flat screen.
Tip:- If you don't see the toolbar, aim the beam toward the phone screen to make it appear.
- When viewing videos, make sure your phone's audio volume is not muted.
Moving and resizing the phone screen
You can move and resize a mirrored phone screen in VR. You can also change the screen back to the default screen size and position.
Here's how:
Moving the phone screen
- Aim below the phone screen to make the move pointer
 appear.
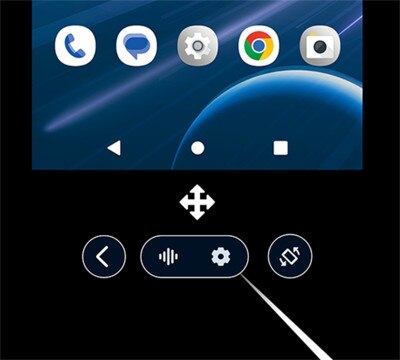
- Pinch your thumb and index finger together or press the trigger on the controller to grab the screen, and then drag it to a new position.
Resizing the phone screen
- Aim toward any of the edges or corners of the phone screen to make a resize pointer appear.
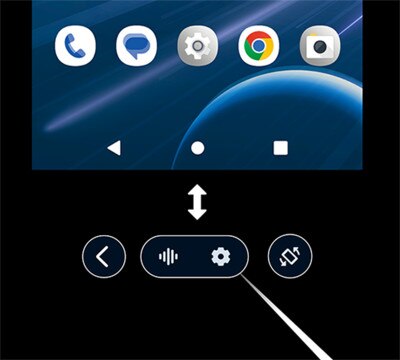
- Pinch your thumb and index finger together or press the trigger on the controller to grab the edge or corner.
- Drag outward to enlarge the screen or inward to shrink the screen.
Changing the screen back to the default size and position
To change the phone screen back to the default size and position, select the
Settings button  on the toolbar, and then select
Reset view.
on the toolbar, and then select
Reset view.
Changing phone mirroring settings
While using phone mirroring, you can change the background and other settings.
Select the
Settings button on the toolbar and change any of the following settings:
on the toolbar and change any of the following settings:
| Setting | Description |
|---|---|
| Reset view | If you've resized or moved the phone screen, reset the phone screen back to the default size or position. |
| Sync with headset | Turn this setting on to make the display orientation follow the position of the headset when you tilt or rotate your head. |
| Virtual environment | Choose a background for your virtual environment when using phone mirroring. |
Was this helpful?
Yes
No
Submit
Thank you! Your feedback helps others to see the most helpful information.