-
Getting started
- About VIVE Business+
- Setting up your devices with VIVE Business+
- Signing in to VIVE Business+
- Creating an organization
- Changing the HTC ID for an organization
- Activating VIVE Business Warranty and Services (BWS)
- Registering several devices with VIVE Business Warranty and Services (BWS)
- Enrolling devices
- Generating a QR code to enroll devices
- Setting up a group of devices
- Checking tasks performed by users
- Accessing the VIVE Forum
-
Managing users
-
Managing devices
- Managing your devices
- Exporting a list of enrolled devices
- Exporting maps and map boundary data
- Editing map details
- Deleting maps and map boundary data
- Deleting a map on the headset
- Creating groups
- Editing group settings
- Adding devices to a group
- Assigning users to a private group
- Assigning maps
- Remotely launching an app
- Mirroring a headset to VIVE Business+
- Switching the Wi-Fi connection
- Adding more seat licenses and extending organization tier validity
- Releasing a seat license
- Reporting an issue
-
Managing contents
- Uploading media files to VIVE Business+
- Editing and deleting media files
- Uploading apps to VIVE Business+
- Adding unmanaged apps to VIVE Business+
- Installing apps on a group of devices
- Editing and deleting apps
- Assigning an EMM app with device owner permissions
- Uploading a Mobile Device Management (MDM) solution
- Uploading other Mobile Device Management (MDM) solutions
- Editing and deleting the management solution app
-
Batch configuration
-
VIVE Business+ console
- About the VIVE Business+ console
- Downloading the VIVE Business+ console
- Setting up the VIVE Business+ console
- Reporting an issue through the VIVE Business+ console
- Creating a batch configuration package for your headset
- Importing maps and batch configuration packages to headsets
- Exporting maps from devices
- Connecting headsets wirelessly
- Enrolling headsets via USB
- Setting VIVE Ultimate Tracker to Wi-Fi LBE mode
- Setting VIVE Ultimate Tracker to standard LBE mode
- Setting VIVE Ultimate Tracker to VO mode
- Creating a batch configuration package for VIVE Ultimate Tracker
- Importing maps and batch configuration packages to trackers
- Enrolling VIVE Ultimate Tracker via USB
- Connecting VIVE Ultimate Tracker wirelessly
- Creating a tracker server
- Updating the system software of VIVE Ultimate Tracker
- Resetting the tracker
-
Completing common tasks
-
Solutions and FAQs
- Can I extend the duration of my trial organization tier?
- Can I upgrade my trial organization tier to Pro or Ultimate?
- How do I check if the batch configuration package was installed?
- What happens to a device when the license expires?
- Why were apps uninstalled from a device?
- How do I set a fixed Wi-Fi MAC address?
- What permissions does each VIVE Business+ role have?
- What should I do if VIVE Business+ settings are not applied?
- What should I do if I see "No more device Seats quote" when trying to enroll VIVE Ultimate Tracker?
- What should I do if I can't connect my tracker wirelessly to the computer?
-
Appendix
- Contact Us
Enrolling devices
You’ll need to enroll your devices to use
VIVE Business+ to manage them.
Important: Before enrolling your devices, make sure you have:
- Signed in to VIVE Business+. See Signing in to VIVE Business+.
- Created and selected your organization. See Creating an organization.
- Registered the devices you want to enroll with VIVE Business Warranty and Services. See Activating VIVE Business Warranty and Services (BWS).
- Generated a QR code. See Generating a QR code to enroll devices.
-
Do one of the following:
- If you're turning on the device for the first time or performed a factory reset, after the device turns on or restarts, put it on, and then press the headset button three times in succession to enable QR code scanning.
- If the device is in use, put on your headset and go to Settings > Advanced > MDM setup > QR code.
-
Scan the QR code on the computer screen using the headset.
Tip: When scanning the QR code:
- Have a distance of 15 to 20 cm between the headset and computer screen.
- Make the QR code dimensions to be at least 15 × 15 cm on the computer screen.
-
Follow the onscreen instructions to enroll the device.
After successfully enrolling the device, it will show a message saying the enrollment was successful.
Note:
- The device must be connected to a Wi-Fi network to enroll it.
- If you see a "Business Warranty and Services (BWS) needed to enroll the device" message, see Activating VIVE Business Warranty and Services (BWS).
-
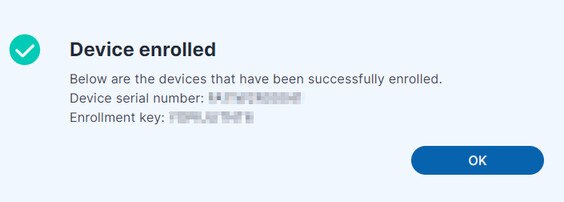
On your computer, check
VIVE Business+. You’ll see a "Device enrolled" message. Click
OK.
-
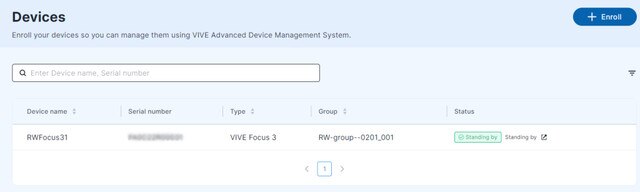
Go to
Manage devices > Devices. You’ll see the status of the enrolled device in the list.
You can also enroll devices via a USB connection instead of scanning a QR code by using VIVE Business+ console. See Enrolling headsets via USB.
Was this helpful?
Yes
No
Submit
Thank you! Your feedback helps others to see the most helpful information.