-
Getting started
-
Managing devices
- Managing VIVE Focus 3 headsets
- Installing system updates
- Why can't I install system updates?
- About batch configuration
-
VIVE Focus 3
-
VIVE Focus Plus and VIVE Focus
- Creating the batch configuration package (VIVE Focus Plus and VIVE Focus)
- Downloading the batch configuration template package
- Activating Kiosk mode
- Enabling and disabling features
- Choosing the apps to show on the headset
- Packaging the files for installation
- Installing the batch configuration package on the device
-
Managing customization
-
Managing users
-
Managing content
-
Content Library
-
Corporate Content
-
Licensed Content
-
Launching content on devices
-
-
Driver Deployment System
-
Installing the Driver Deployment System
-
Administering and managing SteamVR software installations
- Installing the latest SteamVR software on a client computer
- Setting up the host computer to store the SteamVR Library
- Running the Administrator Utility
- Deploying SteamVR software using Device Manager
- Deploying SteamVR software using SteamVR Library
- Uninstalling SteamVR software from a client computer
- Changing a scheduled deployment or uninstall task
-
Troubleshooting and FAQs
-
-
Appendix
- Contact Us
Installing the client software
You need to install the
Driver Deployment System client software on each of the computers where
SteamVR software updates will be deployed.
- Log in using an account with administrator rights on the computer where you want to deploy SteamVR software updates.
-
Copy the
Driver Deployment System installer package to the computer that you want to set up as a client.
Tip: See Downloading the installer package to learn where you can download the installer package.
- Unzip the installer package.
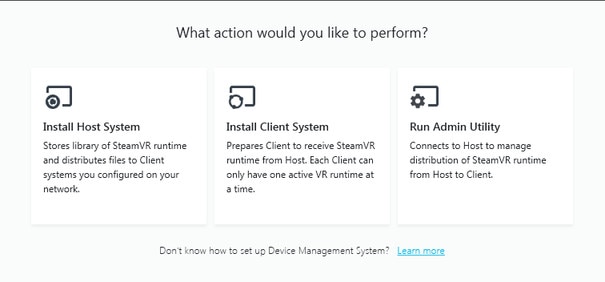
- Double-click ViveEnterpriseOobe.exe to launch the Driver Deployment System setup window.
-
Click
Install Client System.

- Set the installation path on the computer and then click Install. Wait for the installation to finish.
- Once the installation is complete, click Close.
Connecting the client computer to the host computer
After installing the client software, you'll need to establish a connection between the client and host computers.
- Log in using an account with administrator rights on the client computer.
-
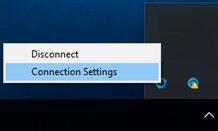
On the system tray, right-click the client app icon and then select
Connection Settings.

-
In the
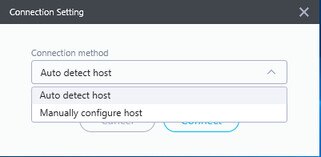
Connection Setting dialog box, select how you want the client computer to connect to the host computer. Choose one from the following:

- Select Auto detect host to automatically detect the host through the UDP protocol.
- Select Manually configure host to enter the host computer's IP address yourself.
Was this helpful?
Yes
No
Submit
Thank you! Your feedback helps others to see the most helpful information.