-
Introduction
-
Managing members, buildings, and spaces
- Signing in to the VIVERSE for Business Management Console
- Viewing the Dashboard
- Types of roles in VIVERSE for Business
- Types of virtual spaces
- Distributing seats
- Assigning account owners
- Assigning building owners
- Adding members to a building
- Assigning space owners
- Adding members to a persistent space
- Changing the space type for spaces with private access
-
Uploading and downloading content
- About the VIVERSE for Business User Console
- Types of files you can view in VIVERSE for Business
- Uploading files to VIVERSE for Business
- Uploading 360° videos
- Adding, changing, and removing bookmarks
- Downloading screenshots and other files created in the virtual space
- Installing VIVERSE add-ons
- Uploading PowerPoint files
-
Entering VIVERSE for Business
- Signing in to VIVERSE for Business
- Navigating VIVERSE for Business with VR controllers
- Navigating VIVERSE for Business with hand gestures
- The VIVERSE Menu
- Changing your avatar
- Private Talk
- Safe zone
- Entering persistent and dynamic spaces
- Managing access permissions in a space
- Removing objects from spaces
- Gathering members to your location
-
Creating and joining sessions
-
Tools you can use
-
Viewing and sharing content
- Types of content windows
- Opening images, documents, and other files
- Accessing web content
- Writing and drawing on the whiteboard
- Working with content windows
- Decorating spaces with images
- Requesting control of a content window or Big Screen
- Using Presentation view
- Mirroring the owner's content window or Big Screen
- Viewing and sharing a 360° video
- Viewing and sharing a 360° image
-
Working with 3D models
-
Accessing your PC
-
Using VIVERSE for Business on computers and mobile devices
- Downloading VIVERSE for Business on computers and mobile devices
- Navigating VIVERSE for Business on your computer
- Navigating VIVERSE for Business on your mobile device
- Using Flythrough View in the desktop app
- Starting a Private Talk session from the desktop and mobile apps
- App controls
- Creating and joining sessions from the desktop and mobile apps
- Using the file browser in the desktop app
- Using the web browser in the desktop app
- Working with content windows in the desktop app
- Viewing content shared by other members
- Sharing your computer screen
- Displaying live captions in the desktop and mobile apps
- Recording meeting minutes in the desktop and mobile apps
- How safe zone works in the desktop and mobile apps
-
Solutions and FAQs
-
General
- What are the system requirements for using VIVERSE for Business with PC VR headsets?
- What devices are compatible with VIVERSE for Business?
- What languages does VIVERSE for Business support?
- How do I send feature requests, feedback, and suggestions to the VIVERSE for Business team?
- Why can't I sign in to the VIVERSE for Business User Console on iPad or iPhone?
- What ports must the network administrator enable for VIVERSE for Business?
-
Avatar
-
Files and content windows
- What types of files can I open and share during a session?
- What's the file size limit for uploading files to VIVERSE for Business?
- How do I upload files to a space or session room?
- Where and for how long are uploaded files stored in VIVERSE for Business?
- How long are screenshots retained in VIVERSE for Business? How do I download them?
- How many files and content windows can I open at the same time?
-
Sessions and spaces
-
3D models
-
Subscriptions and other FAQs
-
- Contact Us
Uploading files to VIVERSE for Business
Before you can view files—PDFs, videos, 3D models, and images—in the virtual space, you need to upload them to your
VIVERSE for Business cloud storage space.
Note: To upload
PowerPoint files to
VIVERSE for Business, you need to use
VIVERSE File Manager. For details, see
Uploading
PowerPoint files.
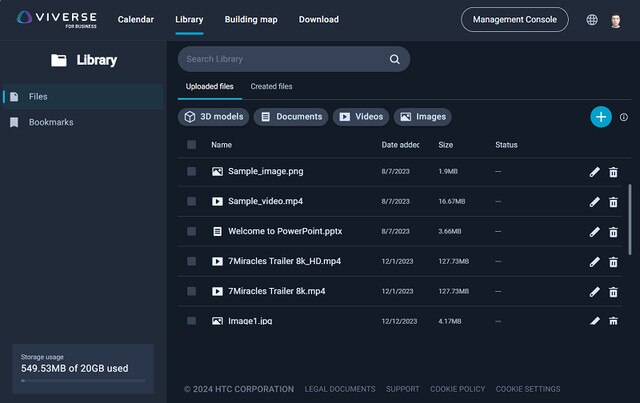
- In your web browser, go to the VIVERSE for Business User Console and sign in with your HTC account.
-
At the top of the webpage, click
Library.
In the menu on the left-hand side,
Files will be selected automatically.
Tip: All your uploaded files will be listed by default. You can click a file type to filter the list by type.
-
On the
Uploaded files tab, click
 > File upload.
Tip: To find out which file formats can be uploaded, see Types of files you can view in VIVERSE for Business.
> File upload.
Tip: To find out which file formats can be uploaded, see Types of files you can view in VIVERSE for Business. -
Select the files you want to upload and click
Open.
Tip: When uploading several files, the upload progress will appear in a panel in the lower right.

- To cancel pending file uploads, click
 next to their filename.
- File uploads that are being converted cannot be canceled.
- To cancel pending file uploads, click
Files you've uploaded will be added under the corresponding file types. You can filter the file list by clicking a file type.
You can also do any of the following with uploaded files:
| Action | Steps |
|---|---|
| Rename a file | Click  . .
|
| Delete a file | Click  . .
|
| Delete multiple files | Select the files and click above the list.
|
| Delete all files | Select the checkbox above the list and click .
|
Was this helpful?
Yes
No
Submit
Thank you! Your feedback helps others to see the most helpful information.