-
Getting started
- About VIVE Business+
- Setting up your devices with VIVE Business+
- Signing in to VIVE Business+
- Creating an organization
- Changing the HTC ID for an organization
- Activating VIVE Business Warranty and Services (BWS)
- Registering several devices with VIVE Business Warranty and Services (BWS)
- Enrolling devices
- Generating a QR code to enroll devices
- Setting up a group of devices
- Checking tasks performed by users
- Accessing the VIVE Forum
-
Managing users
-
Managing devices
- Managing your devices
- Exporting a list of enrolled devices
- Exporting maps and map boundary data
- Editing map details
- Deleting maps and map boundary data
- Deleting a map on the headset
- Creating groups
- Editing group settings
- Adding devices to a group
- Assigning users to a private group
- Assigning maps
- Remotely launching an app
- Mirroring a headset to VIVE Business+
- Switching the Wi-Fi connection
- Adding more seat licenses and extending organization tier validity
- Releasing a seat license
- Reporting an issue
-
Managing contents
- Uploading media files to VIVE Business+
- Editing and deleting media files
- Uploading apps to VIVE Business+
- Adding unmanaged apps to VIVE Business+
- Installing apps on a group of devices
- Editing and deleting apps
- Assigning an EMM app with device owner permissions
- Uploading a Mobile Device Management (MDM) solution
- Uploading other Mobile Device Management (MDM) solutions
- Editing and deleting the management solution app
-
Batch configuration
-
VIVE Business+ console
- About the VIVE Business+ console
- Downloading the VIVE Business+ console
- Setting up the VIVE Business+ console
- Reporting an issue through the VIVE Business+ console
- Creating a batch configuration package for your headset
- Importing maps and batch configuration packages to headsets
- Exporting maps from devices
- Connecting headsets wirelessly
- Enrolling headsets via USB
- Setting VIVE Ultimate Tracker to Wi-Fi LBE mode
- Setting VIVE Ultimate Tracker to standard LBE mode
- Setting VIVE Ultimate Tracker to VO mode
- Creating a batch configuration package for VIVE Ultimate Tracker
- Importing maps and batch configuration packages to trackers
- Enrolling VIVE Ultimate Tracker via USB
- Connecting VIVE Ultimate Tracker wirelessly
- Creating a tracker server
- Updating the system software of VIVE Ultimate Tracker
- Resetting the tracker
-
Completing common tasks
-
Solutions and FAQs
- Can I extend the duration of my trial organization tier?
- Can I upgrade my trial organization tier to Pro or Ultimate?
- How do I check if the batch configuration package was installed?
- What happens to a device when the license expires?
- Why were apps uninstalled from a device?
- How do I set a fixed Wi-Fi MAC address?
- What permissions does each VIVE Business+ role have?
- What should I do if VIVE Business+ settings are not applied?
- What should I do if I see "No more device Seats quote" when trying to enroll VIVE Ultimate Tracker?
- What should I do if I can't connect my tracker wirelessly to the computer?
-
Appendix
- Contact Us
Setting VIVE Ultimate Tracker to Wi-Fi LBE mode
Here's how to set your
VIVE Ultimate Tracker to Wi-Fi LBE mode.
Important: Before setting up, make sure you have the following:
- The required device software and app versions. See Required device software and app versions for LBE and VO modes.
- Pro or Ultimate (or trial) tier subscription for your organization.
- An enrolled VIVE Ultimate Tracker and a seat license for it. See Enrolling VIVE Ultimate Tracker via USB.
-
VIVE Hub installed on another computer. The computer must be different from the one where
VIVE Business+ console is installed. You can download
VIVE Hub
here.
If the computer has VIVE Business Streaming console installed, uninstall it first before installing VIVE Hub.
- In the VIVE Business+ console, go to Batch configuration and click the Headset tab.
- Click Create in the upper right.
- Enter a Name for the batch configuration file and select Wi-Fi LBE for Connection & Tracking Mode. Then click Add.
-
Import the batch configuration package that you've just created to the headset. See
Importing maps and batch configuration packages to headsets.
Important: Make sure the headset is enrolled to VIVE Business+. See Enrolling devices or Enrolling headsets via USB.
-
Create a map using your headset. For instructions, see the following topics:
- Setting up your play area for tracking
- Setting up the play area for map creation
- Creating a map using VIVE Manager
Important: While creating the map using VIVE Manager, you'll need to additionally scan each section of your play area at knee-height (not shoulder-level) in step 9 of Creating a map using VIVE Manager.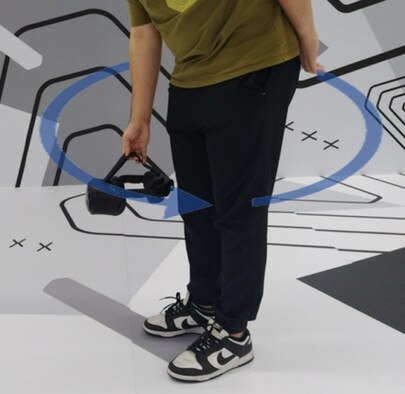
- Export the map you've just created from the headset to VIVE Business+ console. See Exporting maps from devices.
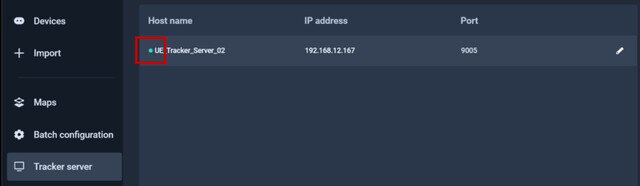
- On the left panel, click Tracker server.
-
Click
Create, enter the required information, and then click
Add.
Important: For IP address, enter the IP address of the computer where VIVE Hub is installed.
-
Connect your tracker to your computer using a
USB Type-C® cable and enroll your tracker. See
Enrolling
VIVE Ultimate Tracker via USB.
- Enter a Name for your tracker.
- In Connection and Tracking mode, select Wi-Fi LBE.
- Select the Tracking options you want.
- In Tracker server name, select the tracker server that you've just created in step 8.
-
In
Wi-Fi connection, enter the same network settings as the ones used by the computer where
VIVE Hub is installed.
If both computers, where VIVE Business+ console and VIVE Hub are installed, are connected to Wi-Fi, we recommend connecting the computers and the trackers to the 5 GHz band of your Wi-Fi access point, and your headset to the 6 GHz band (if available). This ensures optimal performance when using Wi-Fi LBE mode.
- On your other computer, launch VIVE Hub.
-
Go back to the computer where
VIVE Business+ console is installed and check if the tracker server is online.
The tracker server is online if you see a green circle next to the tracker server name.
 Important: If the IP address of the computer where VIVE Hub is installed changes, you'll need to update the tracker server and import the batch configuration package again to the tracker. See Creating a tracker server and Importing maps and batch configuration packages to trackers.
 -
Disconnect the tracker from the computer where
VIVE Business+ console is installed.
You'll see a
Wi-Fi icon next to the tracker name.

-
Import the map you've exported from the headset in step 6 to your
VIVE Ultimate Tracker. See
Importing maps and batch configuration packages to trackers.
Important: Currently, when the tracker is in Wi-Fi LBE mode, importing maps is only supported when the tracker is connected wirelessly to your computer. See Connecting VIVE Ultimate Tracker wirelessly.
Important: When setting trackers (15 or less) to Wi-Fi LBE mode, use these settings for your
Wi-Fi access point:
- Band: 5 GHz
- Channel width: 40 MHz
- Security: WPA2
If you're setting more than 15 trackers to Wi-Fi LBE mode, try connecting them to different
Wi-Fi access points. Make sure your
Wi-Fi access points are using different channels. For channel widths, we recommend selecting non-consecutive channels instead of adjacent channels. This helps minimize interference and ensures better connectivity.
Note:
- To check samples of different Wi-Fi LBE mode setups, see Wi-Fi LBE mode sample setups.
- Check your Wi-Fi router's user guide to see the maximum number of devices it can support.
Was this helpful?
Yes
No
Submit
Thank you! Your feedback helps others to see the most helpful information.