-
About VIVE Sync
-
Getting started
-
Organizing and managing meetings
- Booking a meeting from the Sync website
- Booking a meeting from Outlook
- Booking a meeting room from the lobby
- Uploading files to use in your meetings
- Uploading files from your PC with VIVE Sync File Manager
- Uploading 360° videos
- Joining a VIVE Sync meeting
- Navigating meeting rooms with VR controllers
- Things you can do in a VIVE Sync meeting
- Hosting a meeting
- Changing your presence state
- Private Talk
- Safe zone
- Downloading screenshots and other files created in meetings
-
Presenting to your audience
- Presenting content in a meeting
- Opening documents and other files
- Accessing web content
- Adding, changing, and removing bookmarks
- Writing and drawing on the whiteboard
- Working with content windows
- Using Presentation view
- Requesting control of a content window or Big Screen
- Mirroring the presenter's screen
- Viewing and sharing a 360° video
- Requesting control of a 3D model
- Opening 3D models
-
Tools you can use
-
Accessing your PC
-
Using tracking features in VIVE Sync
-
Using VIVE Sync in VIVE Flow
- Using your phone as a controller in VIVE Sync
- Navigating the virtual space with the phone controller
- Opening and closing the Options Menu with the phone controller
- Interacting with 3D models using the phone controller
- Performing gestures with the phone controller
- Handling content windows with the phone controller
-
Using VIVE Sync on your PC and mobile device
-
Solutions and FAQs
-
General
- How many people can join a VIVE Sync meeting?
- What are the system requirements for using VIVE Sync with a PC VR headset?
- What devices are compatible with VIVE Sync?
- Can people using different VR headsets join the same VIVE Sync meeting?
- What languages does VIVE Sync support?
- Is VIVE Sync compatible with Oculus VR headsets?
- What is the VIVE Avatar Creator app, and where can I find it?
- What types of files can I share during a VIVE Sync meeting?
- What's the file size limit for uploading files to a room?
- How many files and content windows can I open at the same time?
- Why can't I sign in to the VIVE Sync website on iPad or iPhone?
- How do I send feature requests, feedback, and suggestions to the VIVE Sync team?
- What ports must the network administrator enable for VIVE Sync?
-
Videos
-
3D models
-
VIVE Sync meetings
- Can I book VIVE Sync meetings from Outlook?
- I was invited to a VIVE Sync meeting. How do I join?
- Why aren't some meetings listed on the Agenda panel in the VIVE Sync lobby?
- How do I upload files to a meeting room?
- What's the difference between Host code and Guest code?
- Where and for how long are uploaded files stored in VIVE Sync?
- How long are screenshots available after the meeting ends? How do I download them?
-
- Contact Us
Uploading files to use in your meetings
With
VIVE Sync cloud storage, you can manage all your files from one location.
Through the
Sync website, you can upload files from your PC to your
VIVE Sync storage space so you can access them in all your meeting rooms.
Note:
To upload
PowerPoint files, you need to use
VIVE Sync File Manager. For details, see
Uploading files from your PC with
VIVE Sync File Manager.
- In your web browser, go to the Sync website and sign in with your HTC account.
-
At the top of the Sync webpage, click
Storage.
The
Files tab will be selected automatically.
Tip: The left-hand side displays the types of files that can be uploaded. Click a file type and then hover over the info icon
 to see which file formats are supported. See
Types of files you can present in a
VIVE Sync meeting for details.
to see which file formats are supported. See
Types of files you can present in a
VIVE Sync meeting for details.
- Click Upload files > Add files.
- Select the files you want to upload and click Open.
- Click Next to start uploading the files.
Files you've uploaded will be added under the corresponding file types in the Files tab.
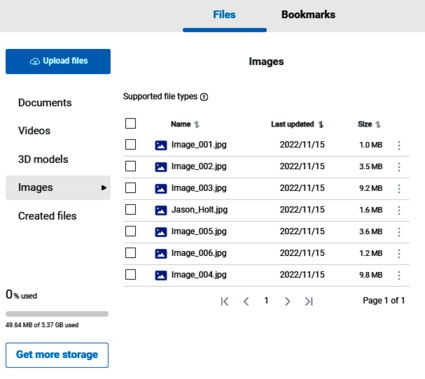
Tip: You can do any of the following with uploaded files:
- Click
 next to a file to rename or delete it.
- Click the column heading to sort by filename or date.
- To delete several files, select them from the list, and then click
 Delete.
- To delete all files, select
Name, and then click
Delete.
Related How-tos
Was this helpful?
Yes
No
Submit
Thank you! Your feedback helps others to see the most helpful information.