-
Introduction
-
Tracking modes
-
ArUco markers and marker-based tracking features
-
ArUco markers
-
Marker-based tracking features
-
-
Marker-Based Location Sharing setup
- Setting up Marker-Based Location Sharing
- Creating ArUco markers for Marker-Based Location Sharing
- Aligning the height of a virtual scene using an ArUco marker
- Moving a user to a specific point in a virtual scene
- Setting up Marker-Based Location Sharing with VIVE Business Streaming
- Marker-Based Location Sharing APIs (AIO)
- Marker-Based Location Sharing APIs (PC VR)
-
LBE Mode/LBE Hybrid Mode setup
-
LBE map configuration
-
Marker-Based Drift Prevention setup
-
Marker-Based Advanced Relocation setup
-
Marker-Based Scene Alignment setup
- Setting up Marker-Based Scene Alignment
- Configuring the position of an ArUco marker in a virtual scene (Unity)
- Creating ArUco markers for Marker-Based Scene Alignment
- Setting up Marker-Based Scene Alignment with VIVE Business Streaming
- Marker-Based Scene Alignment APIs (AIO)
- Marker-Based Scene Alignment APIs (PC VR)
-
Simulator VR Mode setup
- Setting up Simulator VR Mode
- Pairing wrist trackers with a headset
- Installing an anchor controller or tracker in a VR simulator
- Coordinate alignment
- Anchor controller and tracker origin points
- Aligning VR and anchor coordinate systems using a VR controller
- Aligning VR and anchor coordinate systems using an ArUco marker
- Simulator VR Mode FAQs
-
Other services
-
Additional features
- Contact Us
Creating a map with VIVE Manager
-
Make sure your headset is paired with VIVE Manager before trying to create a virtual map. See Pairing the primary headset with VIVE Manager for details.
-
Before creating a map, make sure to clear the tracking map on the headset. You can use VIVE Business+ to clear the map. See Exporting maps and map boundary data in the VIVE Business+ User Guide for details.
-
In
VIVE Manager, select your headset, and then tap
Enterprise Features.

-
Enter your activation code and tap
Activate.
Note:
In versions later than 2.0.12, Enterprise Features is automatically enabled when a headset is enrolled and configured for LBE Mode or LBE Hybrid Mode, and no activation code is required.
- When authorization is complete, tap LBE map configuration.
- Tap Map creation.
-
Calibrate the headset cameras.
VIVE Manager will prompt you to calibrate the headset cameras.
-
Check the calibration status of the headset cameras. To do this, hold the headset firmly by the battery and trace a figure eight while scanning your surroundings with it.
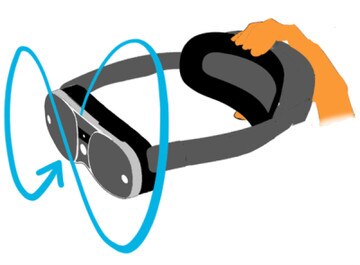
When you start scanning, a progress bar will appear. Continue scanning until the progress bar reaches 100%.
If the headset cameras are calibrated and tracking properly, you can start creating your map. If not, you'll have to scan your environment to collect data and calibrate the cameras. - Calibrate the cameras. To do this, move the headset the same way you did to check the calibration status. VIVE Manager will let you know if you're moving the headset too fast or too slow.
- Repeat the process if needed. When you've collected enough data, VIVE Manager will process it and check the calibration status again. If calibration is successful, you can start creating your map. If not, you'll have to start the process over again.
Note:If camera calibration fails repeatedly, your play area might not have enough visual data to support inside-out tracking. Make sure your environment is well-lit with plenty of complex, contrasting patterns on the walls and floor.
-
Check the calibration status of the headset cameras. To do this, hold the headset firmly by the battery and trace a figure eight while scanning your surroundings with it.
- Move to the center of the first section of the play area.
-
Optional: If you configured
ArUco marker settings for
Marker-Based Drift Prevention or
Marker-Based Advanced Relocation, tap
SELECT FILE, and then select the JSON file from your mobile device.
Note: If you created ArUco markers for Marker-Based Scene Alignment, you'll need to finish creating your map first. After creating a map, you can upload your marker settings and calibrate the map for scene alignment. See Calibrating a map for Marker-Based Scene Alignment for details.
-
On the
Map creation screen in
VIVE Manager, tap
START.
The message Start scanning... will appear.
-
Hold the headset at shoulder level and face forward. The headset will wake from standby and start scanning.
Note:
If you're creating a map to use with VIVE Ultimate Tracker, you'll need to scan each section of your play area at knee-height to support low-angle tracking.
-
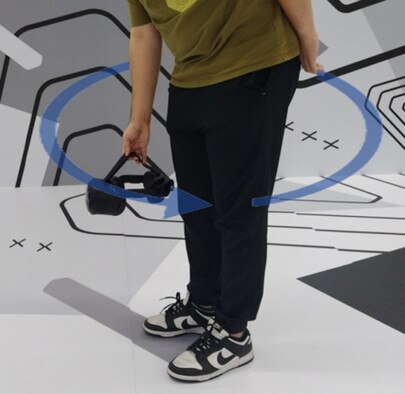
Rotate 360° in a single, continuous motion for 5 seconds. Keep the headset stationary while turning.

-
Rotate 360° again, but this time, tilt the headset up and down while turning. Do this for 9 seconds.

-
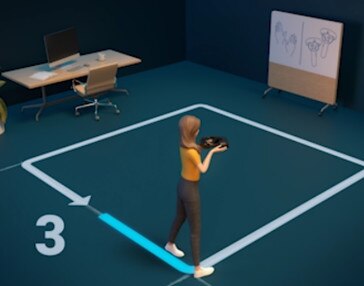
Walk the perimeter of the section at a normal pace to trace the section boundary. Keep the headset stationary while walking.
- Move to the next section you want to scan, tap NEXT, and repeat the scanning process.
-
When you've finished scanning every section, tap
COMPLETE SCAN.
Note: If map usage exceeds 100%, old map data will be discarded to free up space.
- Place the headset in the center of the play area facing forward, and then tap SET.
- Specify the area of your map (in meters), and then tap SAVE.
The map will be saved to the headset and you'll be prompted to restart it. After restarting the headset, you can export the map. See Exporting maps and map boundary data in the VIVE Business+ User Guide for details.
If scanning is interrupted (for example, if the headset enters standby mode or powers off), you'll need to reconnect the headset to your PC and clear the tracking map before scanning the play area again.